Homeschooling

Friday, 28 December 2012

Christingle

My friend invited us over to participate in their Christingle celebration.  I hadn't heard of this before and was interested to see what it was.  This tradition began in Moravia, however the Church of England began to hold Christingle services in 1968, usually during their children services.  Christingle Services are held in Advent to help the children remember why Jesus Christ came into our world, and to help the children remember the people he came to help.

My friend put together a lovely information sheet together for us, which I have scanned into our computer to save for future reference
To make your own Christingle you will need:
an orange
small square of foil
cake candle and holder
red ribbon (long enough to encircle the orange)
4 toothpicks
4 marshmallows
4 soft candies

With each picture I will show you how to assemble your Christingle and the meanings of each item.


The Orange is a sphere and it represents our World

The red ribbon is wrapped around the whole orange.  It is red because that is the color of blood.  Jesus bled as part of his sacrifice to rescue the whole world

Toothpicks represents the four "corners of the Earth"  in other words there's not a bit of our World that God does not care about


The marshmallows and candy represent the gifts that God gives to us --  all that we need each day, enough for all of us.
Lastly a candle is added -- first punch the candle holder thru the aluminum and then into the top of the orange -- the aluminum's  purpose is to help catch the wax.  The Meaning of the candle is Christ is the King of all the Earth.. which is why it is at the top, but also HE is the "Light of the World"

Light the candle
The Christingle Prayer:

God our Father, your Son our Lord Jesus is the light of the world.
Please help us to shine with his light,
so that everyone in the world can know him, worship him and obey him.
Thank you for making him known to us.
Amen

Then the kids blow out the candles.

We enjoyed learning about this tradition of the Church of England and we especially enjoyed the time we spent with our friends.  Thank you for sharing this wonderful tradition!


I am continuing to take a little bit of time off from blogging to spend it with my family will be back to posting 3X a week Jan 4th:) Until then, enjoy spending quality time with your family:)

Friday, 21 December 2012

UK Christmas Cake Part 2

In November I made a UK Christmas cake.  You can find the initial post here, along with the recipe.
Here is how it came out of the oven

The cake requires requires feeding;)  I poked several holes in the top using a wooden skewer

I added about 2 or 3 tablespoons of Brandy to the cake.  I did this 2X while the cake was in storage.  Allowing approximately 2-3 weeks between each feeding:)

Knowing the cake was just too big for my family to eat,so  I cut the cake in half, frosted it, and sent one half back to the states to my mother and father.  I am hoping it gets to them by Christmas or New Year!


So this is half of the cake placed on a aluminum wrapped cutting board because I don't own a cake platter:( 


Take a small jar of jam and microwave it for 20 seconds to liquified
it 
Using a pastry brush wipe the jam all over the cake this acts as a glue for the marzipan icing

You will need 2 types of cake covering


First is Marzipan--needs to be rolled out on parchment paper use a little confectioner  sugar so it doesn't stick to the paper


Carefully placed the marzipan on to the cake

Carefully cover the cake making sure there are no folds in the marzipan -- carefully cut off any extra around the cake.  Don't cut to close to the cake as the icing will raise a little exposing the cake.

Now bring out the Regal icing

Roll it out on Parchment paper

Carefully place onto the Christmas cake --smooth side up.

Once again carefully cover the cake making sure there are no creases or folds in the icing

Cut any excess icing away at a slight angle


Icing is completed

Now is time to decorate.  I chose to use a pretty green ribbon.  Unfortunately the one I sent my mother  was without a ribbon as I hadn't one available in the house, sorry MOM

I need to work on my bow a bit more--but you get the idea:)

I will carefully wrap up my cake in foil until Christmas and then wait till Christmas which is in 4 days:)


MERRY CHRISTMAS AND A VERY HAPPY NEW YEAR TO YOU!!!!!


I will be taking some time off from blogging to spend with my family, see you in the New Year!


Wednesday, 19 December 2012

Christmas Play -- The Snowman

Last week I took the kids to a Christmas show with the UK home schooling group.  This show while unfamiliar to me is a UK Christmas classic.  My daughter fell in love with the Piano piece "Walking in the Air"  The music is by Howard Blake who is an English composer and this year marks the 30th anniversary of the animated TV show, which has no words except for the song "Walking in the Air."

We were pleased to see that on stage was going to be a Orchestra


The story narrators--the version we saw did have a story line

Little Man loves the shadow puppets used to tell the story along with the music and narrators
The Orchestra set the musical mood and of coursed played the famous song "Walking in the Air"

After the show the Conductor explained the various parts of  a Orchestra and introduced the instruments.  They also held a short Q and A session which was wonderful for the children


We had a lovely time.  I found this version of the full story.  I hope you will enjoy watching it with your children:)  This year Channel 4 will be showing a sequel called the "Snowman and the Snow Dog" in honor of the 30 year anniversary.  We plan on watching it as a family:)


Monday, 17 December 2012

Gingerbread houses

Friends came over last week and we had the kids construct Gingerbread houses.  The kids had a lot of fun and we had fun eating way too much candy:)
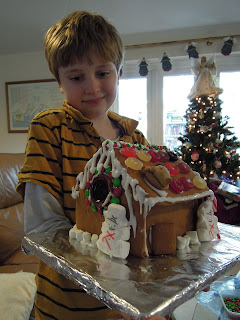
My friend made all the Gingerbread pieces and I bought all the candy.  

Kids worked hard on constructing their houses.  

A door way was added so we could add a battery light as we made candy stain glass windows:)

Roof construction always the tricky part

Little Man's completed house 

Princess' completed house

The children showed a bit more restraint in how much candy they added to their houses this year.  Although no restraint was shown in how much candy they ate:)!

Friday, 14 December 2012

Hoar Frost arrives

I have never seen this phenomenon in the States although I am sure some areas have it.   Hoar Frost is a deposit of ice crystals that form on grass, trees, and anything else outside making the area looked like a dusting of snow.  It happens when the air is extremely humid but also extremely still--essentially, it's a freezing fog.  We'd seen it in movies like "Narnia", but always thought that it was a Hollywood creation and didn't really look like that, but it does!

If you look closely you can see the ice crystals.  The kids and I woke up to this beautiful sight in the neighborhood and went out to explore and take pictures.

Our entire neighborhood is covered in ice crystals

1/2 inch thick in some places

leaves are covered

grass

This was the neatest to see spider webs along the garden wall

I get the sense we have a lot of spiders in our backyard

This is my garden netting, it is usually green


bushes covered in ice
My camera couldn't get really close up pictures of the crystals but it was so interesting to examine them with the kids.

Wednesday, 12 December 2012

Painting a Fresco

The kids and I are continuing our studies thru Ancient civilizations.  We started with learning about Mesopotamia and are now learning about the spread of civilization.  In one of the many books we are reading I found a project for painting a Fresco that I thought the kids would enjoy.  We have seen many Frescos in our travels while visiting palaces, museums and even Cathedrals.


First I got out some linen cloth (Burlap would have been better) 

I mixed up some plaster of paris and poured it on the cloth.    Place wax paper beneath the cloth as the Plaster of Paris will seep thru

Spread it out and shake gently to remove air bubbles, be careful not to make it to thin  or too thick.   Allow the plaster to dry about an hour until hard but still damp to touch

carefully spray the surface with a little of water and begin painting on your designs.  

We used water color paints

Next step is to add color to age the piece.  The children both refused to do this step saying it would ruin their  art :(

So I took my fresco and added brown and yellow paint to cover the art  
Then I showed the children the next step--which they were equally unsure of--breaking the plaster

Princess face at the thought of breaking her art -- but she did eventually agree.  Gently break the plaster carefully so as not to remove from the linen/Burlap cloth.  Make as many or as few breaks as you like

Next step is to add glue to the surface to reseal the plaster

Spread an even amount of glue on the plaster making sure the cracks have glue.  The glue will also add a nice shine to your project


Princess finished project--Dragons of course:)

Little Man said his painting was of a mountain and birds flying.
My finished piece--the breaks and missing chips of paint make the piece look older.  If only my art work was a little more realistic for the time period:)


 We had fun with this project!  Here is the video where I got the directions for this project--I modified it slightly:)