I have a new look for my blog! My very dear friend Lynda helped to create my new look. Lynda has started a new business of blog design in order to help her stay home and home school her son. I asked Lynda to help me update my blog as it hasn't been updated since its inception over a year ago. Working with Lynda has been so easy. I wasn't sure what I wanted to do or in what direction I wanted to go but Lynda helped narrow down my thoughts and gave me several options to choose from. She was absolutely wonderful when I asked to make changes and then changed my mind, more than once:).
I love the pictures that we chose as it shows my family doing the things we love and experiencing our life's adventures which is what this blog is all about.
If you are looking for some new ideas please check out Lynda and her new blog design site. Her prices are very reasonable and she will work with you until you are happy with the results:)!!! Lynda's site has several examples of the recent work she has done for other bloggers if you want to see more styles of her work. Please contact Lynda at My Heart's Desire Creations, if you are interested in making any changes to your own blog site!
Homeschooling
▼
Monday, 31 October 2011
Friday, 28 October 2011
Halloween cooking
This week we had our Halloween party and for the first time the kids and I tried making some ghoulish recipes. My Mom sent us a Halloween cookbook and it gave us a few ideas to try. I should first say I am not the type of Mom who does creative things in the kitchen. I am the type of Mom who would rather buy a birthday cake at the store rather than try to create a one of a kind birthday cake:).
The kids were great helpers and so excited to be hosting a Halloween party
The kids chose 3 different types of cupcakes they wanted to make. I only made one batch of cup cakes. The kids chose to make spider cupcakes, Frankenstein cupcakes and dirt cupcakes with gummy worm inside
Ghostly graveyard
Witches broomstick:) served with Witches blood (strawberry jam)
Worm sandwiches (made of hot dogs)
Cheesy tortilla using Halloween cookie cutters.
The recipe called for salsa and beans but the kids wanted it plain.
ghoulish punch-- I put water in a glove and froze it so we had an ice hand in the punch and added body part gummy candy. According to the book they float but for our punch they sank to the bottom:(. Picture doesn't do it justice but it was pretty cool to see the results:)
Our friends brought over
Jello filled oranges. Aren't they cute!
Witches hat brownie cake, Yummy!
As you can see we had a great feast and none of it healthy:).
Wednesday, 26 October 2011
Monday, 24 October 2011
Pumpkin Farm in the UK
Fall is the hardest time of the year for me as I miss the USA and all the fall activities, decorations and family time that Halloween and Thanksgiving brings to US families. We have lived in the UK for 3 years now and this is the first time I have located a pumpkin farm for the kids and I to visit!
While it was a pumpkin farm the kids and I were a bit disappointed as the size of the pumpkins were quite small and there weren't the assortment of gourds, corn stalks and scarecrows to bring about the sense of Autumn fun that I and the kids miss.
I let each child chose one pumpkin to bring home to paint and then I chose one that we would carve into our Jack-o-lantern
After picking out our pumpkins the kids played on the playground for a bit before heading home
I am linking this up to the Let's Hit the Road Field trip hop
Friday, 21 October 2011
Fire Safety Week --The Jaws of life in action
Last week the kids and I went to the military base to the Fire departments open house for Fire Safety week. It was a fantastic day and since their weren't many people there we got lots of personal interactions from the fire men.
Kids meeting Sparky the Fire dog!
Practicing using a fire extinguisher to put out a fire. I didn't realize that extinguishers only have about one minute worth of chemicals to put out a fire. So each of us were timed to see who could put out the fire. Little Man took 30 second, Princes 4.8 seconds and I took 5.3 seconds!
A Chip pan demonstration. These are big in England. Chip pan fires are French fry grease pans. The Fire men said on base there are an average of 1 chip pan fire a year:(. I have never used this method of making fries preferring to bake them and after seeing this I have no intention of changing my method!
We have all been told don't add water to a grease fire...want to know what will happen...look at next picture!
WOW that was with only 1 cup of water added!!
An old WWII fire engine. Lots of fire equipment that the kids got to explore and ring bells, and climb both old and new. What was interesting about this WWII fire engine is the basket style object around on the pipes. I was told that it could be placed in a river or pond to soak up water if there was no hydrant around in the country side. The basket help stop weeds, rocks, fish from entering the water pipe and going into the fire.
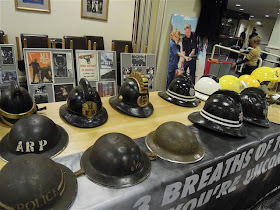
UK Fire helmets from the 1700 up to modern day. The kids tried on them all I think. We learned that the first helmet were made of brass, then they switched to leather and cork and the moderns ones are made of Kevlar.
Kids loved this using the heat sensor machine, sorry I forgot the correct name. The Firemen let the kids play with this for quite a bit even letting the kids go into a dark room and try to find each other. Princess loved it and wants one of her own now:)!
However I must say the most interesting part of the day was watching the firemen use the Jaws of Life to take apart a car to get to a car accident victim. This was fascinating and I took lots of pictures:)
This is the car before the demonstration. The Firemen were so great they talk the entire process thru for the kids and I.
Coming to the scene of the accident, the first thing they do is brace the car with supports to stop the suspension from bouncing around and possibly hurting the victim. The firemen wearing the red helmet was the victims point of contact. He was talking to her and reassuring her that help was coming. He was also the person to let the medics know if the victim was in trouble and they would need to move faster. Right now they are acting as if they have all the time they need to do it correctly.
Once the car is supported a firemen enters the car to assess the victim and remain with them until they are able to get the victim out of the car.
Next the firemen went around to all the windows and broke them, except the front windshield which they removed.
Next came the Jaws of Life were the fire men cut the roof off the car.
First they removed all the car doors
Next they used the Jaws of Life to cut thru the car frame (I have close up pictures at the end)
They cut all around the car.
Next they use a tool to cut thru the seat belts.
Removing the roof of the car!
car is now a convertible!
Bringing out the back board
Sliding the back board behind the volunteer victim and getting ready to remove her from the car.
Getting her lifted/slid onto the back board!
Carrying the victim away from the car
This is what the car looked like after it was over. I think the Insurance company will have to write it off:)!
This is the damage that the jaw of Life can do to a car!!! it cut thru the metal so easily.
Kids were really enthralled with watching this process and when we got home they wrote it up in their journals:)
I am linking this up to the Field trip hop! Why don't you join in!
Kids meeting Sparky the Fire dog!
Practicing using a fire extinguisher to put out a fire. I didn't realize that extinguishers only have about one minute worth of chemicals to put out a fire. So each of us were timed to see who could put out the fire. Little Man took 30 second, Princes 4.8 seconds and I took 5.3 seconds!
A Chip pan demonstration. These are big in England. Chip pan fires are French fry grease pans. The Fire men said on base there are an average of 1 chip pan fire a year:(. I have never used this method of making fries preferring to bake them and after seeing this I have no intention of changing my method!
We have all been told don't add water to a grease fire...want to know what will happen...look at next picture!
WOW that was with only 1 cup of water added!!
An old WWII fire engine. Lots of fire equipment that the kids got to explore and ring bells, and climb both old and new. What was interesting about this WWII fire engine is the basket style object around on the pipes. I was told that it could be placed in a river or pond to soak up water if there was no hydrant around in the country side. The basket help stop weeds, rocks, fish from entering the water pipe and going into the fire.
UK Fire helmets from the 1700 up to modern day. The kids tried on them all I think. We learned that the first helmet were made of brass, then they switched to leather and cork and the moderns ones are made of Kevlar.
Kids loved this using the heat sensor machine, sorry I forgot the correct name. The Firemen let the kids play with this for quite a bit even letting the kids go into a dark room and try to find each other. Princess loved it and wants one of her own now:)!
However I must say the most interesting part of the day was watching the firemen use the Jaws of Life to take apart a car to get to a car accident victim. This was fascinating and I took lots of pictures:)
This is the car before the demonstration. The Firemen were so great they talk the entire process thru for the kids and I.
Coming to the scene of the accident, the first thing they do is brace the car with supports to stop the suspension from bouncing around and possibly hurting the victim. The firemen wearing the red helmet was the victims point of contact. He was talking to her and reassuring her that help was coming. He was also the person to let the medics know if the victim was in trouble and they would need to move faster. Right now they are acting as if they have all the time they need to do it correctly.
Once the car is supported a firemen enters the car to assess the victim and remain with them until they are able to get the victim out of the car.
Next the firemen went around to all the windows and broke them, except the front windshield which they removed.
Next came the Jaws of Life were the fire men cut the roof off the car.
First they removed all the car doors
Next they used the Jaws of Life to cut thru the car frame (I have close up pictures at the end)
They cut all around the car.
Next they use a tool to cut thru the seat belts.
Removing the roof of the car!
car is now a convertible!
Bringing out the back board
Sliding the back board behind the volunteer victim and getting ready to remove her from the car.
Getting her lifted/slid onto the back board!
Carrying the victim away from the car
This is what the car looked like after it was over. I think the Insurance company will have to write it off:)!
This is the damage that the jaw of Life can do to a car!!! it cut thru the metal so easily.
Kids were really enthralled with watching this process and when we got home they wrote it up in their journals:)
I am linking this up to the Field trip hop! Why don't you join in!